1. Prelude
All the stuff you should know for the rest of the documentation to make sense.
When possible point towards official sources rather than re-writing documentation!
1.1. General Programming
1.1.1. General Workflow Loops
According to the IEEE, Software Engineering is the systematic, disciplined, quantifiable approach to the design, development and maintenance of software systems. As such software engineers are frequently obsessed with processes - understanding the processes at play and figuring out how to make them consistent is one key to achieving the systematic, disciplined, and quantifiable approach that is called for.
Below we cover several core processes before assembling them to a full workflow.
Core Development Process Loop
The core development process loop is shown in the diagram.
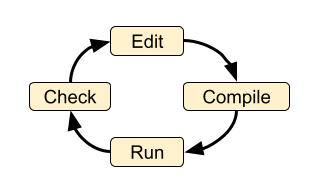
These four steps are at the heart of any software work. In different environments, some of the steps might be automated or hidden, but the steps must be carried out in order for software to be created. With a single person this is straightforward. The individual may elect to add additional steps such as “backup work” or “publish finished code”.
Loop with individual version control
The most basic version control process loop is simply: edit, stage, commit.
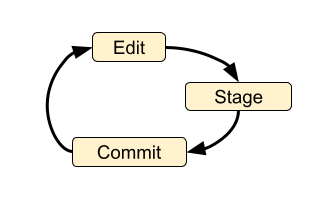
By itself this loop is not particularly useful - it doesn’t even involve running the code, let alone checking it! But if we add the compile, run and check steps we are getting closer to a robust development process:
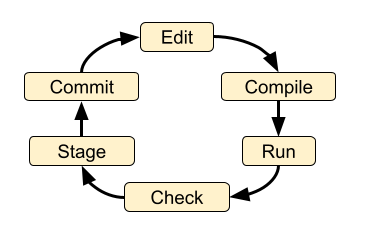
There are a number of other steps that might be added:
checkout branch,
stash changes not ready to be committed
merge branch(es)
pull from another repo,
push to another repo,
rebase changes
Also note that the loop doesn’t not strictly need to happen in the above order. Sometimes you might want to commit code before it runs or you might want to cycle through the edit → compile → run → check loop many times before committing.
Incorporating more people
When multiple people are involved their efforts must be synchronized so that their changes to the system are compatible and so the people do not interfere with each other. Git does not specify exactly how this should be done and leaves many of the details up to the end users. Git provides the general tools to accomplish collaborative (or individual) work in a wide variety of ways. When you are interacting with other people you will need to be pushing your changes to a remote repository and pulling changes from remote repositories. When things are working smoothly, there are rarely changes that need to be reconciled (merge conflicts). This leads to a clean and readable history.
There are many complexities and possible scenarios that can come up as this process is carried out amongst multiple people. It is hard to describe the scenarios and the implications of different choices without the folks involved having a pretty solid handle on the basic core developer workflow as well as the mechanics of the following Git fundamentals:
Making a commit.
Checking out branches.
A clone vs a fork.
Git vs Github.
Viewing git log information (either via command line or GUI app like gitk).
Interacting with remote repositories.
Browsing a repository on Github
1.1.2. Software Development Patterns
At the highest level, the process of software development is simply “write some code (instructions) and get a machine to carry out the instructions”. At the end of the day, this is all we are trying to accomplish. However the situation is never simple and there are an infinite number of ways to accomplish such a seemingly simple task. When a computer programmer talks about toolchains and environment they are talking about the setup for the process of “write code and make a machine run it”. There is no single best way to set up your environment, and each person has their own needs and preferences. Sometimes there are constraints due to hardware (i.e. working on a High Performance Computing system or a tiny embedded microprocessor), sometimes the constraints come from available software tools or the skills of the people writing the code. You will encounter a variety of patterns for the environments and toolchains used in this project. Understanding these patterns will help you select the best way to perform your work and have it mesh with the existing project.
Usually when you start writing some code you are in a purely exploratory and experimental mode and you reach for whatever environment and toolchain is comfortable and close at hand. Once your code has matured and you want to make it available to someone else, you need to put some thought into the environment and toolchain for working with the code. Also as your code grows in complexity, different environments make certain operations easier or harder.
The majority of the dvmdostem code is designed to be run via command line interface (CLI), meaning it is expected that you have a terminal (presumably bash or something similar) on an Ubuntu-like operating system. You are expected to interact with the programs by running the scripts or compiled binaries from the command line (REPL).
Following is a brief overview of a variety of different programming environments and toolchain patterns.
Read Eval Print Loop (REPL, shell, terminal) REPL stands for “Read Eval Print Loop”. The REPL can be written in nearly any language and can be designed to interpret nearly any language. Users may be familiar with a number of REPL implementations including the basic Python interpreterprompt (
>>>), the IPython interpreter prompt ([In 0]:), and R prompt (>) orsimply the terminal prompt in their shell of choice (commonly bash). A REPL typically ingests one line of text, follows the instructions, and returns the user to the prompt. This is handy for prototyping, but quickly becomes tedious to type if you have multi-line instructions (code). For this reason there is the concept of a script which provides a means for submitting multiple lines of code to a REPLGUI Application Common, intuitive for exploration. User uses a mouse and keyboard to click buttons and interact with the software. May be written in a wide variety of languages, but typically requires a “framework” of existing code that helps with common patterns. Frameworks you might hear of are: Tcl/Tkinter, QT, Cocoa, Swing, SWT, Delphi.
Interpreted Program (script) An interpreted programming language is translated from human-written code (instructions) into computer instructions (machine language) on-the-fly. Python is an interpreted language meaning that there is not an explicit compile step required to run the program. You simply submit the script (your Python code) to the Python interpreter and it is translated into machine code on the fly.
Compiled Program (binary) A compiled programming language required a dedicated “build step” to translate the human-written code (instructions) into machine code. The result of the build step is an object file or a “compiled binary”. The main dvmdostem binary is a compiled C++ program. When the source code is modified, you must run make to re-compile the project and create a new binary object file before running it.
Integrated Development Environment (IDE) Typically this is a GUI application that bundles together a bunch of handing tools into one package. In general the tools are:
Text editor
REPL
Debugger
Build tools
File browser
There are many different IDEs each with their own advantages and disadvantages. Often IDEs are particularly suited to a certain language (i.e. PyCharm for Python, Eclipse for C/C++, etc).
IPython IPython is simply an enhanced REPL for Python. It comes with heaps of extra features that make life easier, including support for multi-line statements, built-in help, auto-complete features, and much more.
Basic IDE All you really need for writing compiled or interpreted programs are a text editor and a terminal that will let you compile the program (if necessary) and execute it.
Jupyter Notebook This is a novel addition to the traditional programming toolset. Jupyter Notebooks combine features of:
an advanced (enhanced) REPL,
an IDE,
formatted writing/documentation system and,
run-time for the program.
This is accomplished using a client server architecture. In order to execute the code in a Jupyter Notebook, you must also run (or connect to) a “Notebook Server” which is a python environment and run-time. One advantage of this is that the client portion can be an interactive web page that is viewable for anyone with a standard web browser - provided they can make requests to a functioning backend server which provides the Python run-time.
The server can actually run a variety of languages, so it is possible to use R or Julia or a number of other languages as the notebook code cell language.
Notebooks are great for:
Intermingling code and documentation or explanations (formatted text)
Experimenting with small code snippets
Presenting interactive plots from remote servers without needing an XWindow or other
DISPLAYforwarding systemDeveloping and prototyping code
Notebooks are challenging for:
Version control
Writing code that is easy to run in a non-notebook environment (library code)
Groups that do not have the bandwidth or abilities for running individual notebook servers or to run and maintain a central notebook server
Debugging certain types of process
Virtual Machine
In order to wrap up an environment such that you can preserve it or pass it to someone else, people have devised the concept of a Virtual Machine (VM). In 2022, there are innumerable ways to run a VM (VMware, Parallels, Multipass, Docker, etc), each with its own tradeoffs. The important thing to remember is that a Virtual Machine attempts to encapsulate an environment. Each of the items in the above list (Notebook, IPython, IDE, etc) might be able to run inside a virtual machine. If you are not provided with a perfectly functioning environment it is often up to you to understand what you need for an execution context and set it up for yourself; a VM of some variety frequently provides some way to achieve this.
1.2. Version Control
1.2.1. Why use version control?
As mentioned in the Version Management section, using version control in a project really serves several purposes:
Provenance - being able to understand (and trust) where the code came from.
Facilitating contributions from multiple people.
Backup - being able to revert the code to a previous state in case of an error or other need.
These needs can of course be met without a full fledged version control system and as you struggle to learn Git you will almost certainly be tempted to just go back to periodically emailing yourself backups or printing out the code and locking it in your gun safe. However I would encourage you to persevere as once you have the basics of Git under your belt, it will fundamentally change the way you think about programming and will enable you to interact with a wide variety of software projects as well as having great control over your own projects.
As you work with Git it is valuable to keep in mind the reasons you are using version control: backup, collaboration, and provenance. Cultivating a clean, readable, traceable history frequently requires extra steps and care that will seem extraneous in the moment. However with a multi-person project this care is essential to making the project history useful. When you are stuck and wondering what to do, it is often helpful to think in terms of how you want the code history (commit graph) to look when you are finished. With the idea of the history you want to achieve in mind, you can then find a path forward.
1.2.2. Getting Help
General Git help is beyond the scope of this the dvmdostem documentation. Here a few key concepts that the documentation assumes you are familiar with:
What is a commit.
What is a SHA id.
Difference between a fork and a clone.
Difference between git push, pull, fetch, and pull request (PR).
Difference between git branch, merge and rebase.
Here are several recommendations for general Git help:
Note
It is important to make commits that are concise, organized, and readable, thus fulfilling the goals of using a version control system. This comes down to using git on a day-to-day basis and learning:
what is a commit,
how to write a good commit message,
how to separate different concerns into different commits,
how to fine tune a commit (interactive rebase, amend and when to use it),
understanding what types of files or information should not be kept
under version control,
how to use branches,
how to merge branches, and
the implications of making merges in an environment with multiple developers.
1.2.3. Tools
It is possible to use git purely from the command line, and in many
cases this is the easiest way to go. However for some people and some
situations a Graphical User Interface (GUI) is really helpful. Find a solution
that works for you and your computing platform! There are generally two major
functions of the Git GUIs, sometimes bundled in one application, and
sometimes not:
Viewing the project history.
Adding to the project history (making commits, pushing, pulling, merging, rebasing).
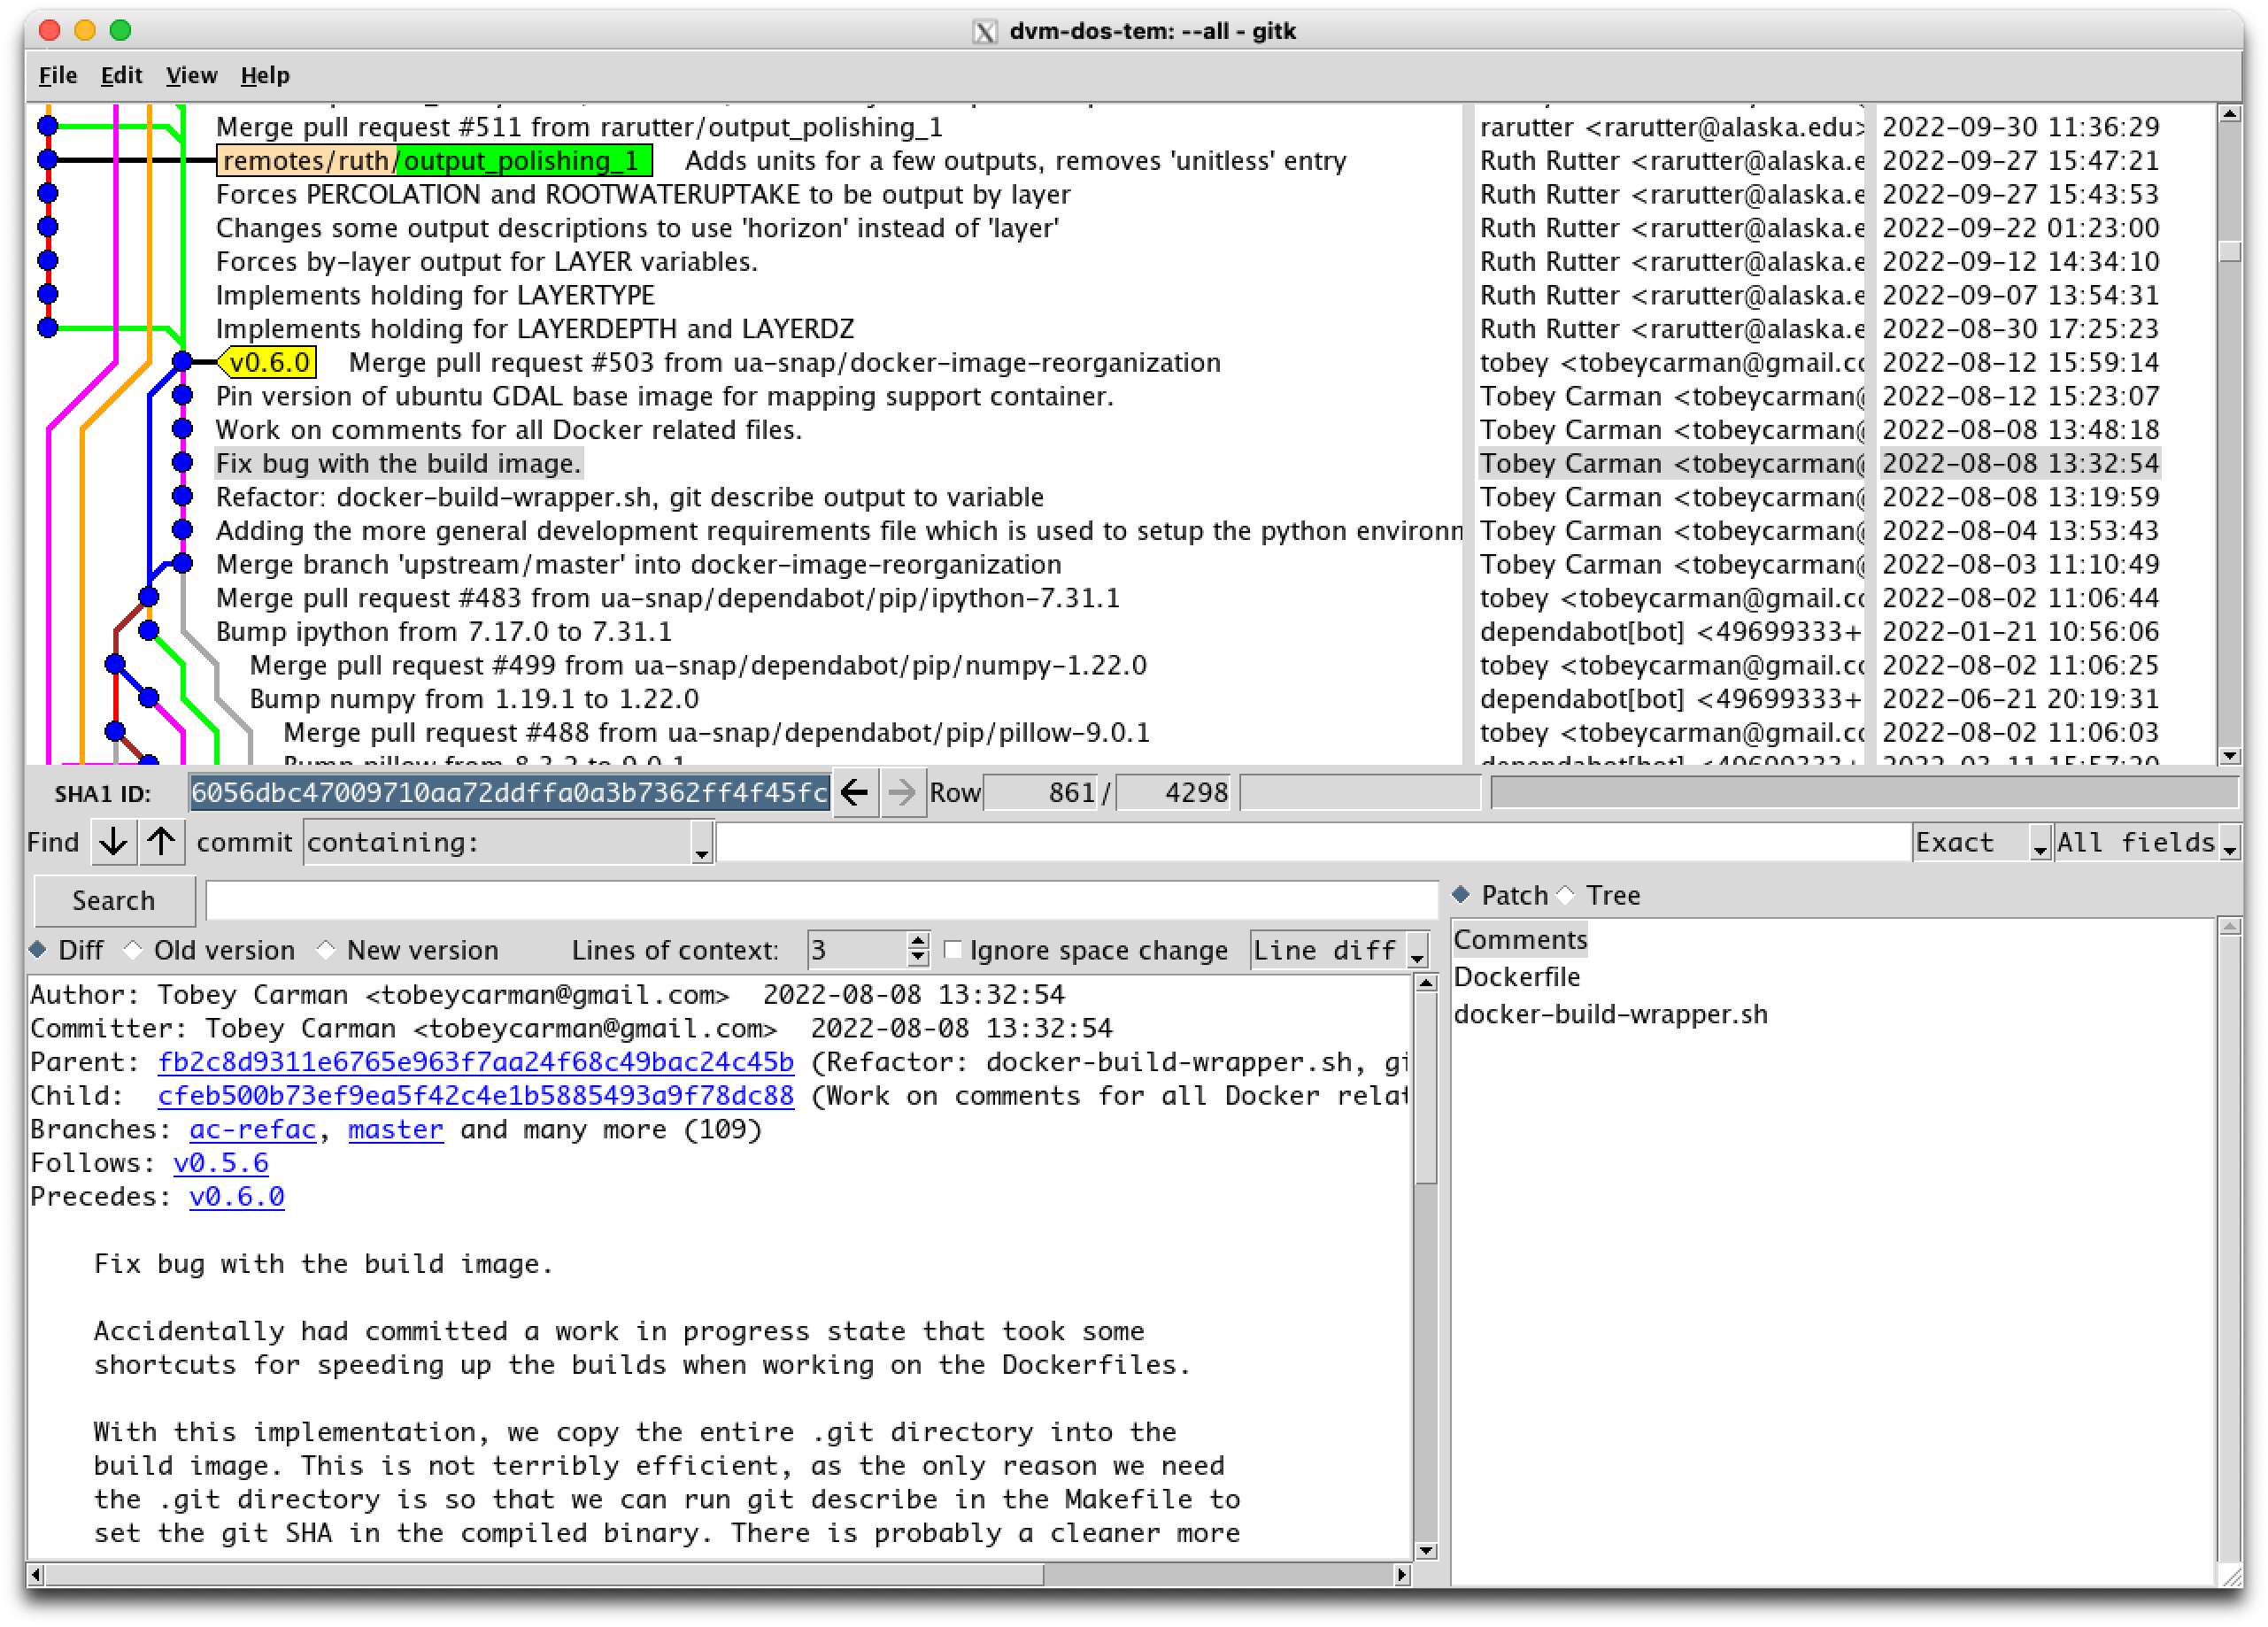
In 2022 there are many many graphical front ends to Git, and many text editors and IDEs have built in support for at least some Git features. You will need to find a tool that works for you. Although the interfaces look antiquated, you might find that the programs Gitk (history viewer) and Git Gui (for making commits) are perfectly sufficient, and these are readily available on most systems. At the end of the day you are likely to use a combination of the command line interface and a graphical frontend tool.
The Gitk interface looks like this and can be adjusted in myriad ways to suit your needs:
1.2.4. Setup
Your Git remote repositories should be appropriately named. This document assumes that you are using the following convention:
The remote named origin should generally point to your fork of the codebase, so the URL will look something like:
https://github.com/<your user name>/dvm-dos-tem.The remote named
upstreamshould generally point tohttps://github.com/uaf-arctic-eco-modeling/dvm-dos-temorgit@github.com:uaf-arctic-eco-modeling/dvm-dos-tem.gitif you will be contributing.
Note
If you plan to push changes you will need to setup ssh keys. The
directions for this are here:
https://docs.github.com/en/authentication/connecting-to-github-with-ssh/about-ssh
Note
It is strongly encouraged that you go to the effort of making sure your current git branch is displayed in your terminal shell prompt. There are many examples floating around online of how to achieve this for all major operating systems and shells; one example here
1.3. Documentation Types
WRITE THIS….
1.4. Docker
As of 2023, Docker is the current recommended virtualization tool for working with TEM. It is definitely still possible to use a traditional Virtual Machine, (i.e. with VirtualBox, perhaps managed by Vagrant), but all of our current documentation assumed you will be using Docker. Overall Docker offers some advantages in being able to standardize the internal layout of the virtual environment amongst users.
The following slideshow attempts to explain some of the concepts.
1.5. Plotting and Graphical Outputs
Plotting is a natural and essential step in the modelling process. The use-cases and limitations are numerous and there is not a single silver bullet plotting solution that is sure to work for you.
When working on or with plotting code, it is helpful to remember that problems can arise in two overlapping spheres: capability and environment.
Capability refers to whether or not the analysis and visualisation you seek are implemented in the code you are working with.
Environment referes to whether the computing environment(s) you work with have the appropriate hardware, software, tools, etc to carry out the capabilities of the code you are working with.
These concerns are sometimes totally distinct and sometimes arise in conflict with each other. Ideally code is written to work with a wide variety of environments as this makes it easier for other people to use the code in their circumstances.
There are several paradigms that can be used for working with plots and graphical output formats. The paradigms are surveyed below.
1.5.1. Interactive Window
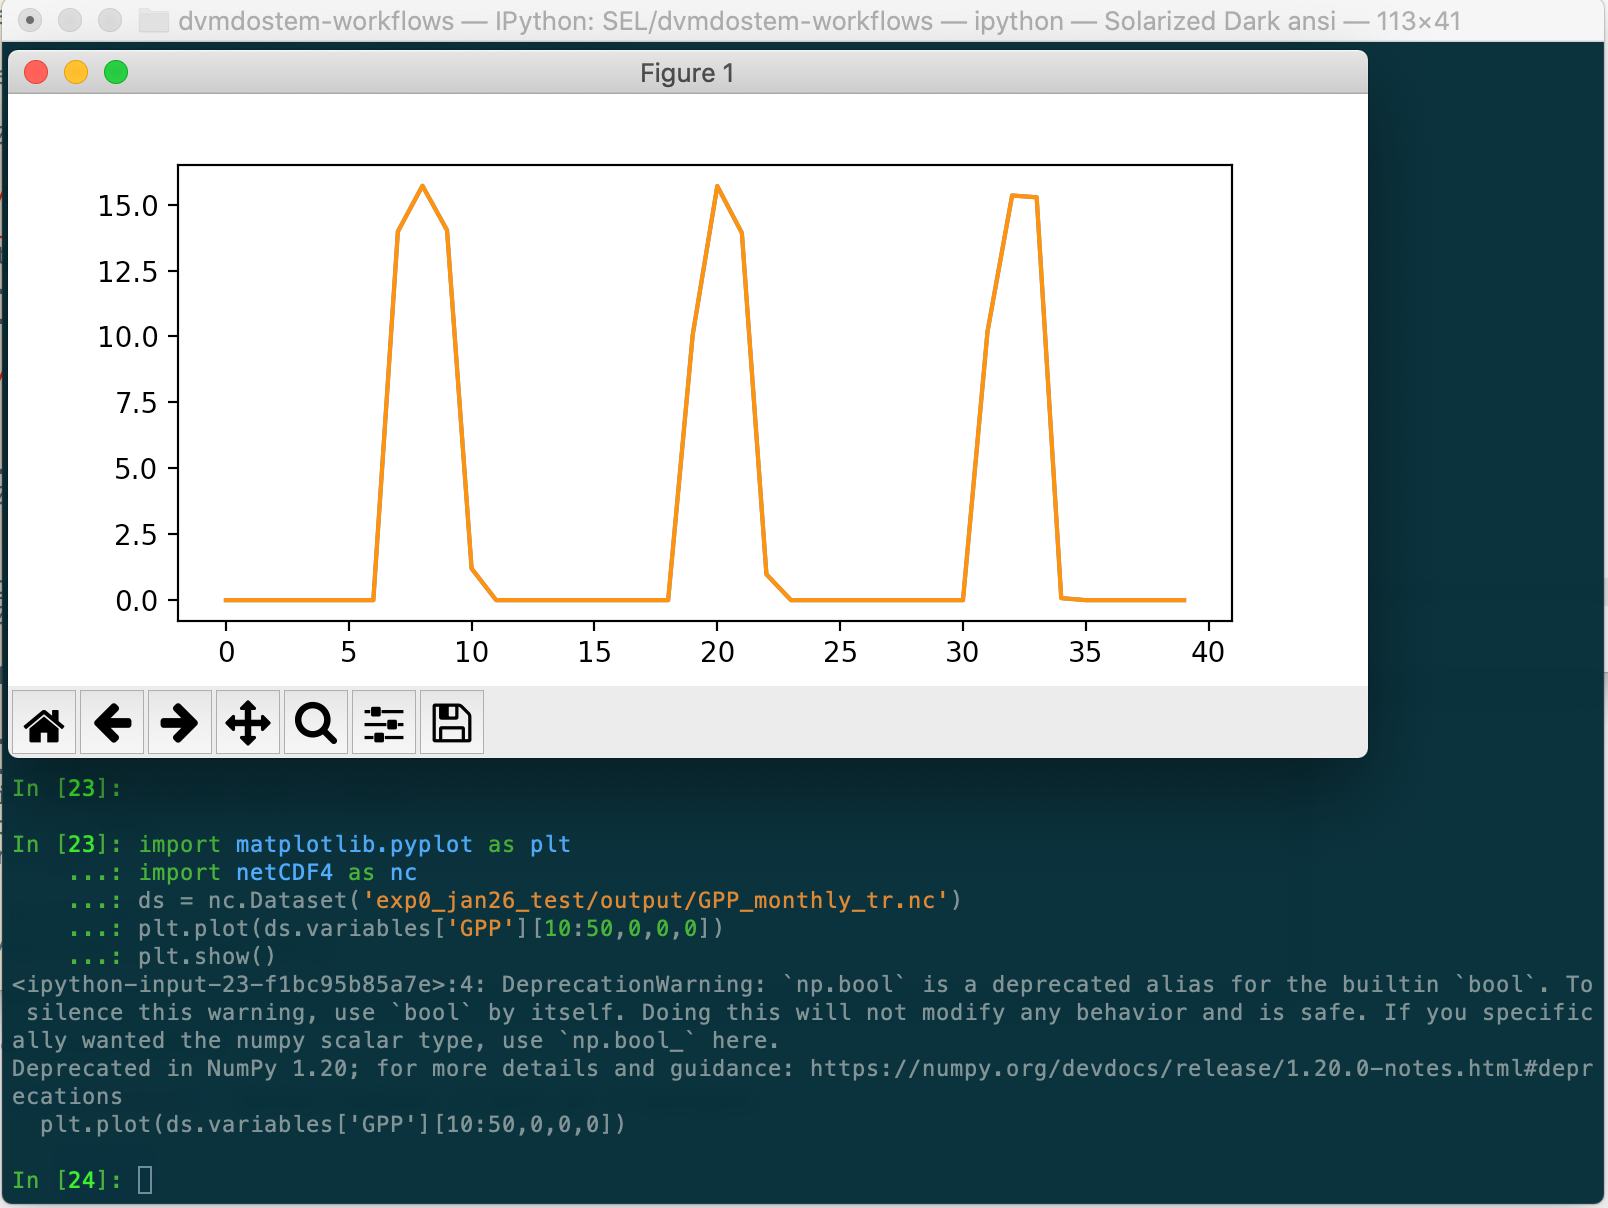
The interactive window paradigm assumes that you have a “windowing” system available to you, i.e. something like XWindows or Quartz. In this paradigm, the plotting library and tools work with the windowing system to display your plot and (sometimes) allow you to interact with the plot. Frequently you can update the plot by either using interactive tools, or re-running all or part of the code. The ability to interact with the plot(s) is very helpful for exploring data as you don’t need to know a-priori the best settings for axis tick marks, limits, etc.
Matplotlib has popularized this approach, but it is available in many other systems and baked into some IDEs.
1.5.2. Static Plot
The static plot paradigm is the simplest. In this mode, code generates and
outputs a .png or .jpg file (or similar). Because there is no way to
interact with the image after it has been built, this method can be difficult
when you are first exploring the data and you haven’t found the best settings
for axis bounds, ticks, etc.
When using a static image, you generally need a way to control where the resulting files are saved.
Many libraries are able to generate static images.
1.5.3. Interactive Browser Plots
The interactive browser plot paradigm provides the same capabilites as an Interactive Window plot, but instead of using a special (and often platform specific) windowing system, a web browser is used to display the plots. This offers a number of distinct advantages:
web browsers are omni-present,
the ecosystem of available tools for display and interaction in a web browser is very rich,
de-coupling of the genearation and display aspects of plotting.
In addition to de-coupling the generation and display conerns, this approach allows for networking and enables plotting using and Docker container run-time or any other network-accessible run-time!
There are many tools that leverage this functionality, notably Jupyter Notebooks, Bokeh, and RStudio.